Doll Eye Lash Map: Step-by-Step Mapping Guide
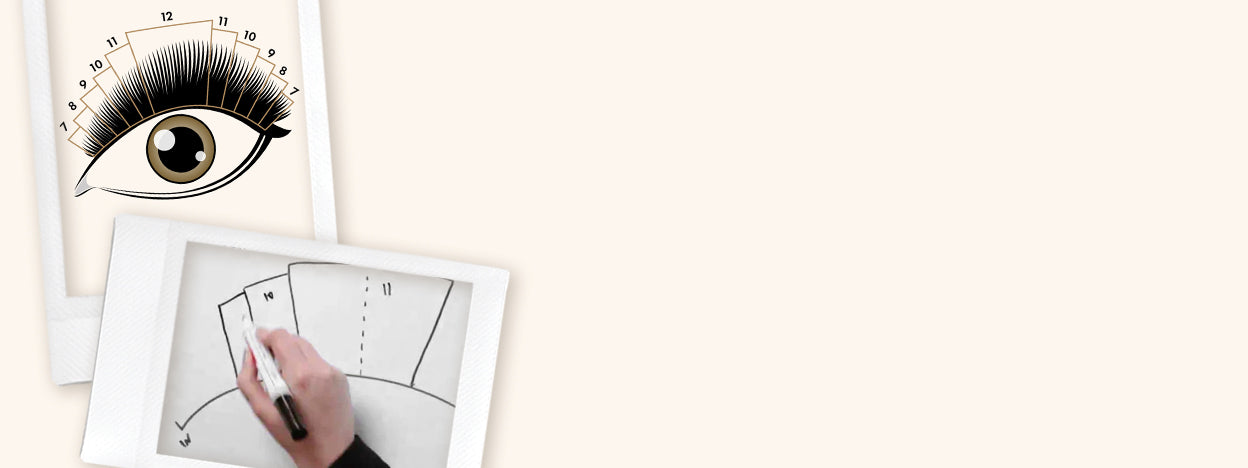

Table of Contents
A Doll Eye lash map places the longest eyelash extensions through the centre of the lash line, with lengths gradually decreasing towards the inner and outer corners. This creates a rounded, open-eye effect and can be adapted for Classic, Hybrid or Volume lash extensions according to the client’s natural lashes and desired finish.
A Step-by-Step Guide to Lash Mapping Doll Eye Lashes
Scrolling through Instagram, you'll see a new lash map every other week. But a few styles have stood the test of time because they flatter so many of our clients. One of our favourites is the Dolly, also known as Doll Eye lashes.
Lash mapping is essential for a great set of lashes. It helps ensure balance across both eyes, creates smooth transitions between lengths and provides a customised set for each client. Carefully selected lengths also help protect the finer natural lashes at the inner and outer corners.
What Are Doll Eye Lashes?
For Lash Technicians looking to expand their repertoire of lash mapping styles, Doll Eye lashes are a must! This eyelash extension style is all about creating a balanced, open-eyed look.
The longest lash extensions are strategically placed in the middle section of the lash line, gradually tapering towards the inner and outer corners. This enhances the natural shape of the eyes while creating the illusion of larger, more open eyes.
Whether your client wants a subtle enhancement or a more dramatic flutter, the map can be adapted to their natural lashes and eye shape.

How to Create Doll Eye Lashes
A Dolly style is achieved by putting the longest extensions in the middle of the eye. Sounds simple, right? There are a few important steps to follow so that the finished set looks even and creates the intended shape.
The simplest way to remember the map is to think about symmetry: the gradual reduction in length towards the outer corner is mirrored towards the inner corner. Adjust the individual sections where necessary to account for differences between your client’s eyes and natural lashes.

Lash Mapping for Doll Eye Lashes
1. Mark the Corners and Centre of the Eye
Start by marking the inner and outer corners on the under eye patches, using the first and last natural eyelashes as your reference points. Then mark the middle of the eye.
Identify the position of the iris while your client looks straight ahead before closing their eyes. This gives you a reference for the central section and helps you position the map consistently across both eyes.
2. Mark the Longest Section
Draw a line out from the middle of the eye, then mark the edges of the iris with two lines on either side of your centre line. This central section is where your longest suitable lash extensions will go.

Next, connect those marks so that you can easily see the section you’ll be working outwards from.

3. Divide the Remaining Sections
Work outwards from the middle section in evenly sized segments, mirroring the sections on either side. From your longest central length, drop down by 1mm in stages towards the inner and outer corners to create a smooth transition.

4. Customise the Lengths
It’s up to you how many lengths you use and which lengths are suitable. If your client wants a natural, understated look, a range such as 7–10mm may be appropriate. For a more dramatic result, you might use 7–12mm, provided the natural lashes can comfortably support the selected extensions.
Keep the extensions at the inner and outer corners short and lightweight. These natural lashes are often finer, so lengths of 7mm or less may be appropriate for some clients. Always assess the natural lash rather than choosing a length simply because it appears on the map.
Once you have checked the map on both eyes and completed your pretreatment, you’re ready to begin application.
Doll Eye Lash Map Example
A typical Doll Eye lash map starts with shorter extensions at the inner corner, gradually increases towards the centre and then reduces towards the outer corner. The example below demonstrates the basic shape.
| Lash-Line Section | Example Length | Purpose |
|---|---|---|
| Inner corner | 7–8mm | Creates a gradual transition from the fine inner natural lashes. |
| Inner-middle section | 9–10mm | Gradually builds length towards the centre of the eye. |
| Central section | 11–12mm | Creates the longest point and characteristic open-eye effect. |
| Outer-middle section | 9–10mm | Mirrors the gradual increase used on the inner side. |
| Outer corner | 7–8mm | Tapers the map and avoids excessive length at the outer corner. |
These lengths are examples only. Every Doll Eye lash map must be adapted to the length, strength and condition of the client’s natural lashes. Use shorter lengths wherever necessary, including at the corners.
Classic vs Volume Doll Eye Lashes
The same Doll Eye lash map can be used with Classic, Hybrid or Volume techniques. The central positioning of the longest extensions remains consistent, but the selected technique affects the density, definition and texture of the finished set.
- Classic Doll Eye lashes create a defined, natural-looking result by applying one extension to each suitable isolated natural lash.
- Hybrid Doll Eye lashes combine Classic extensions and Volume fans to add definition alongside soft texture.
- Volume Doll Eye lashes use lightweight fans to create a fuller, fluffier result while retaining the rounded, open-eye shape.
Whichever technique you select, the length and weight of every extension or fan must be suitable for the client’s natural lashes. Explore our Classic lash extensions and Volume lashes for professional treatments.
Who Will Doll Eye Lashes Suit Best?
Clients with Wider-Set Eyes
Doll Eye lashes can give the appearance that the eyes are closer together, making them a useful option for clients with wider-set eyes. When assessing eye spacing, compare the distance between the eyes with the width of one eye. If the gap is wider, the central emphasis of a Dolly map may help create a more balanced appearance.
Clients with Smaller or Narrower Eyes
The rounded shape can make smaller or narrower eyes appear bigger and more open. Adjust the length, curl and density to achieve the amount of enhancement your client wants.
When Another Lash Map May Be More Suitable
For clients who already have very round or prominent eyes, a strong Doll Eye effect may emphasise that roundness further. Discuss their preferred result and consider a different map if they would like a more elongated appearance.
For other styling options, explore our guides to Cat Eye lashes and Squirrel lashes.
Doll Eye Lash Map FAQs
What Is a Doll Eye Lash Map?
A Doll Eye lash map positions the longest extensions through the central section of the lash line. The lengths gradually become shorter towards both the inner and outer corners, creating a rounded, open-eye effect.
Where Do the Longest Lashes Go in a Doll Eye Map?
The longest suitable extensions are normally positioned around the central section above the iris. The exact placement may be adjusted to suit the client’s eye shape and account for natural differences between the eyes.
What Lengths Are Used for Doll Eye Lashes?
The appropriate lengths depend on the strength and length of the client’s natural lashes. A softer set might use a range such as 7–10mm, while a more dramatic map might reach 11–12mm in the centre before decreasing towards the corners. These measurements are examples and must be customised for each client.
Can You Use a Doll Eye Map for Volume Lashes?
Yes. A Doll Eye Volume set follows the same central-length pattern but uses lightweight fans to create additional fullness and texture. Fan weight, width and density must remain appropriate for the client’s natural lashes.
Is a Doll Eye Lash Map Suitable for Lash Clusters?
The same central-length pattern can inspire a Doll Eye arrangement when using products specifically designed as lash clusters. However, cluster application differs from professional individual lash extensions. Products must be applied according to their instructions, and professional eyelash-extension adhesive must never be used for self-application.
What Is the Difference Between Doll Eye and Cat Eye Lashes?
Doll Eye lashes place the longest extensions in the centre to create a rounded, open appearance. Cat Eye lashes increase in length towards the outer portion of the lash line to produce a more elongated effect.
We hope this guide helps you create beautifully balanced Doll Eye lash sets. Mark your central section carefully, taper the lengths towards both corners and customise the map to your client’s natural lashes and features. Happy lashing!
Check out these featured products